Streaming virtual competitions with Vikis
Table of Contents
Introduction to live streaming
This page will guide you through live streaming basics and also provide information on how Vikis helps organizing and streaming virtual competitions. If you are already familiar with how streams work and what OBS is, feel free to skip the first part and move straight to next section.
In order to create a live stream you need these three components
- Content. This can be live video from a camera, a pre-recorded video or any other video and audio material that your want to share with your audience.
- Streaming service. Before your videos or data coming from camera can be shown in an online stream it has to be processed in a special (and quite complex) way. Fortunately you don't have to worry about that because there are plenty of existing services that would do that for you. YouTube, Facebook and Twitch are some examples.
- Client streaming software (also called encoder). Typically streaming services receive stream content via a computer protocol called RTMP (google for it if you feel curious). Encoder takes your content encodes and sends it to the streaming service of your choice using RTMP. In a way it is the glue that connects your content to the streaming service. On one side it takes all the content you have and helps you to present it the way you want, and on the other side it sends the final stream content to a streaming service. Open Broadcasting Studio (OBS) is a free software that is a de-facto standard for organizing small scale live streams. OBS can be quite sophisticated, but it is also quite easy to get started with it. You'll find some basic instructions on how to work with it further in this document. Thanks to RTMP standard, everything you do with OBS can be used with any streaming service, so you don't have to make the decision of what service to use up front.

Getting started with OBS
In this section, you will learn OBS basics and stream an existing video.
OBS works on Windows, Mac OS and Linux. This guide uses the Windows version as an example, but other platforms are very similar if not identical most of the time.
To get started, install OBS from this location https://obsproject.com/download If you are on Windows, make sure that you install 64-bit version (it is the default, just make sure not to select the 32-bit version). The installation process is quite straightforward - you can just accept all the defaults. One exception could be the language. This guide uses the English version, so if you want all the user interface elements to be named exactly as in this guide, you should choose English. You can also change the language later in File -> Settings -> General.
What kind of computer do I need? Streaming is a demanding process and it does require a higher-end hardware. However, for testing it out and getting familiar with the process almost any modern computer will suffice. Hardware requirements for streaming in production depend on many factors, mainly on the resolution and frames per second (FPS). We recommend at least 16GB of RAM and CPU similar to Core i7 2.8Ghz or better. Streaming could also be demanding on connection bandwidth. What's most important is the uplink, i.e. the speed at which you can send the data. For a 1280x720 stream you would need 4-5mbit of uplink bandwidth. You can test your connection speed at www.speedtest.net. It is always a good idea to test your set up before going live on the competition day.
Next, install VLC Video Player. VLC Video Player is a free media player that can play almost any video you can find. It also works together with OBS so we can use it to stream some existing videos. Please use the exact version found behind this link https://get.videolan.org/vlc/3.0.7/win64/vlc-3.0.7-win64.exe. If you choose to use a different version, make sure that you use the 64-bit version. Otherwise VLC and OBS won't work together.
Why should I use an old version? You don't have to, and usually using an up to date version is a good idea. However, the most recent version at the time of this writing (3.0.11) had a bug that caused distortions along the lower edge of the video. Using an older version solved the problem. If you feel comfortable with troubleshooting things like that, feel free to use any versions you like. Otherwise you might want to stick with the versions mentioned here.
After launching OBS, it might suggest running a test to figure our the settings that work best for your computer. You can skip it for now and get back to it later. Now you should see a screen similar to this.

For now, the most important elements are the Sources and the Preview Area. In OBS terminology, source is anything you want to add to your stream - live data from cameras or microphones, video files, images, your computer screen, etc. Sources can be organized into scenes to make your production look more professional. But for now we'll just go ahead with one scene. Before we move on, let's change our stream resolution. Click Settings button in the lower-right block, then go to Video and select 1280x720 in two top drop-down menus.

Now it is time to add some content to our stream. Of course, everything you are doing so far won't be actually streamed anywhere (we'll do that later, too). At the moment, we are just setting up our workspace to see how the stream would look like. Let's start by adding a VLC Video Source. We will use it to play an existing video. Click the + button and select VLC Video Source. If you don't see such an item in the pop-up, try restarting OBS. If you still don't see it, it might mean that you installed 32-bit VLC instead of 64-bit version.

Add one video to VLC playlist (use this link https://bit.ly/3g3kvdE).

Close the dialog and make sure that the source is visible by clicking on the eye icon on the right side of the source name. The video may take up to 20 seconds to start, so be patient. Now you should see a playing video in your preview area. You can change the size of the video by dragging the red frame around it just like you resize windows on your computer.

Where does the video come from? VLC player fetches the video from the internet using the link you provided and you can make this video a part of your stream. We will come back to this point when we talk about how Vikis works.
Now let's add another source. Click the + icon and choose Browser. Don't change anything and just close the dialog.

The new source will be added to the source list. Make both of your sources visible (eye icon). If your video has stopped playing by this time, you can hide the source and make it visible again. Now that both of your sources are visible, you should see something similar to this in preview area.

Note that the browser source partially covers the video. Sources are stacked on top of each other like sheets of paper. The topmost source in the source list is at the top of the stack (meaning it covers the sources below).
Now you know enough to move to the next section and learn how Vikis comes into our streaming setup. And if you want to learn more about OBS, there are plenty of resources on the internet.
Using Vikis with OBS
First, let's look at the slightly modified version of the diagram we had in the beginning of the previous section.
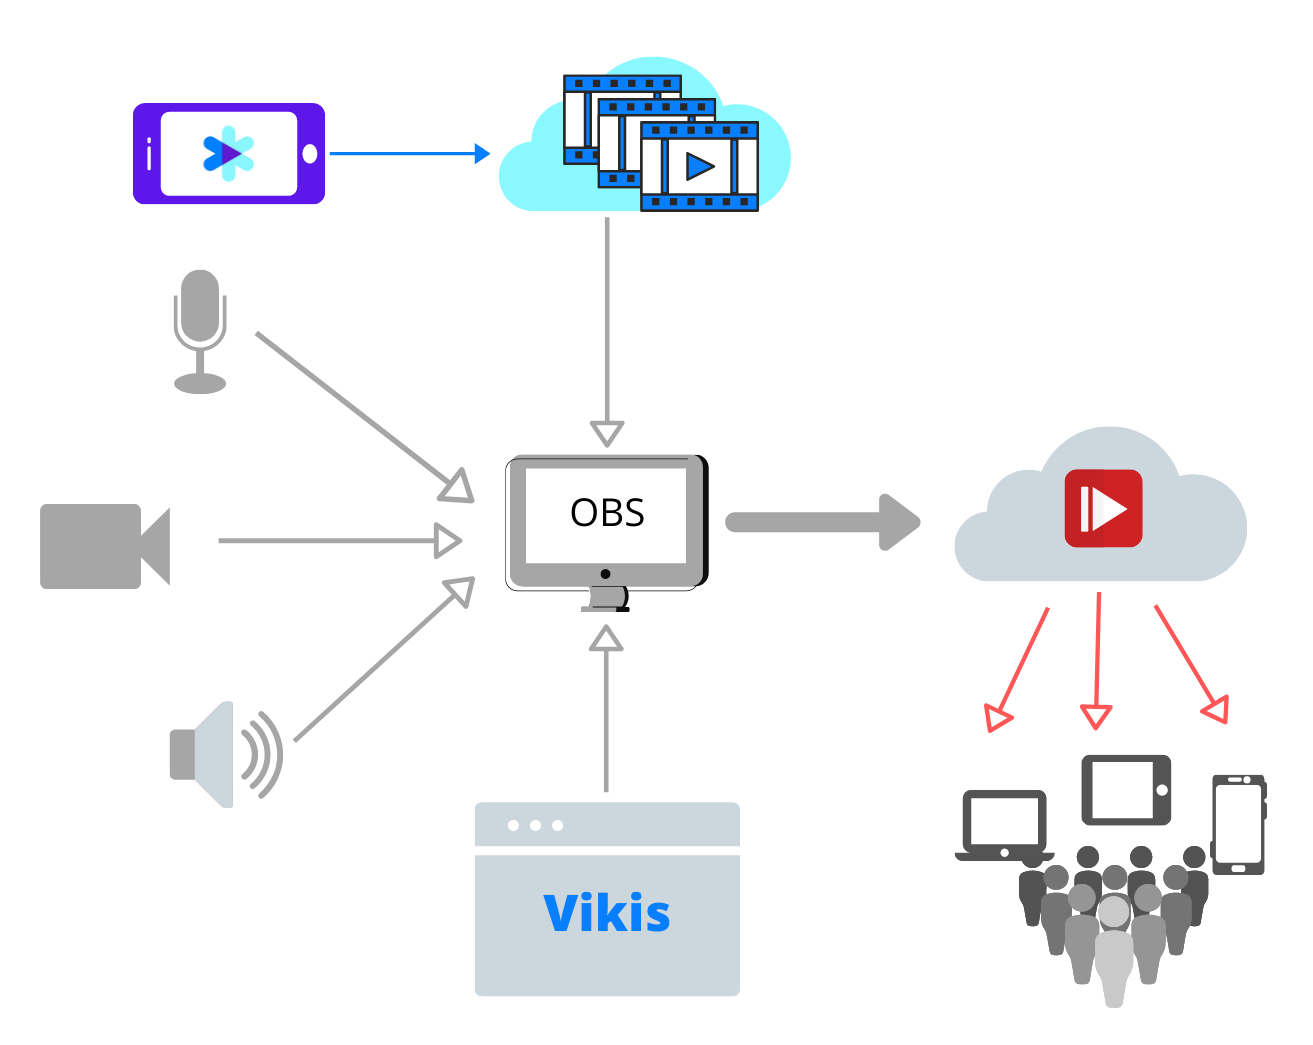
Videos recorded by Vikis smartphone application are uploaded to a cloud storage. Each video has a link and when this link is opened with a media player (like VLC) the video will be played. Remember how we played a video from the internet with VLC player plugin in the previous exercise? We are going to use the same technique to play videos recorded by Vikis.
Before we continue, there's one more piece of software that has to be installed - OBS WebSocket plugin (https://github.com/Palakis/obs-websocket/releases/download/4.8.0/obs-websocket-4.8.0-Windows-Installer.exe). This plugin allows remote controlling OBS from a different application. Soon you will see why we need it. Accept all the defaults during installation and restart OBS. Now open the Tools menu. You should see a new item there called WebSocket settings. If you see that, your installation was successful.

Now let's reconfigure the OBS workspace to make it work with Vikis. Delete all scenes and all sources that you have in your workspace and create a scene called Scene. Then add a VLC video source and call it VLC Video Source. Make sure to uncheck the Loop Playlist option. Not that the names must be written exactly as specified (including spaces and capital letters). Otherwise Vikis will not be able to do its job.
Create another source of type Browser and call it PERFORMANCE_TITLE. Accept the default settings.
Now go to https://vikis.fi in your browser and login to the application. If you don't have login credentials, you can request them by sending a mail to vikis(at)vikis.fi. Go to Events -> <Your event name> and press the Update video data button.

Now go to Stream. On the left side you will see a list of participants. If no videos have been uploaded you won't be able try everything described below, but you can still familiarize yourself with the application.
On the right, you should see Connect to OBS button and a text box above it. Enter localhost:4444 in the text box, make sure OBS is running and click the button. A list of OBS sources should appear on the page. VLC Video Source has a special role and does not appear on this list, so you should see only one item called PERFORMANCE_TITLE.
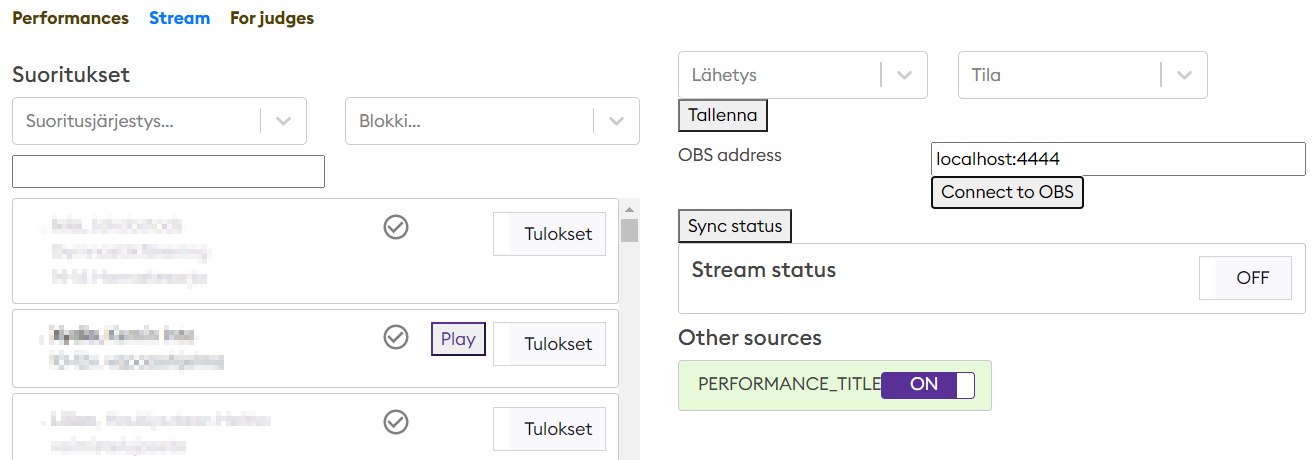
Click on the switch button next to the source name. The source should become hidden in OBS. Click again and the source will become visible. If you do the same in OBS the state will be reflected on the web page. So far this is not very useful because you can do just that directly from OBS. We will make it a little more useful in the next step.
Go back to OBS and configure PERFORMANCE_TITLE source as shown below (only the highlighted parts are important).

Drag the source to the bottom of your stream preview area and click on the lock icon next to source name to lock the position. Also make sure that PERRORMANCE_TITLE is on top of VLC Video Source in source list.

If the video has been uploaded, there will be a Play button next to participant's name in the performance list. Press that button and make PERFORMANCE_TITLE visible. The video should start playing in OBS. Press Play next to a different participant and a different video will play. Note also that the text displayed in PERFORMANCE_TITLE source changes when you change the video. You can keep it visible during the entire performance or show and hide as you see fit. Pressing the those two buttons is almost everything you'll have to do on the stream day!
How it works (for the curious minds). Thanks to WebSocket plugin Vikis can remote control OBS. As mentioned above, each Vikis video has a link that can be played by VLC. In order to play a video in OBS, you would need to go to VLC Source settings and add the video URL to playlist. Same way you would need to change the participants info displayed in the stream. Vikis automates these simple actions and makes them available to you with a single click.
The last piece of automation that Vikis provides to you is showing performance results. Currently participant-specific results can be displayed only for rhythmic gymnastics and AGG. We are planning to add this functionality for other sports too.
Go back to OBS and create another Browser source called PERFORMANCE_RESULTS. Use the same settings as for PERFORMANCE_TITLE, except for size. Make it full screen, i.e. 1280x720. Position it to the center of the screen by right-clicking on the source name and selecting Transform -> Center to screen. Lock the source to avoid accidentally moving it. Make sure it is on the top of sources list.

Go back to Vikis. The new source is not yet visible on the source list. Click Sync Status. Now the source should appear on the list. Press Results switch button next to participant name. The source should become visible and display performance results. Of course, the results won't be shown if they have not yet been entered and published in Kisanet, but at least you should see a screen with the competition name, participant name and category. If you don't see even that it means you have not yet imported the rotation list from Kisanet to Vikis. Import the rotation list and try again.
The three sources you've created so far are the ones that Vikis works with and saves a lot of manual work by automating these tasks: playing a performance video, showing participant info and performance results. Anything else available in OBS still remains available to you and you can make your stream as sophisticated as you want.
What if my videos cannot be played? Video playback links get old in about a week after the video has been uploaded. This is why it is a good idea to update the links before playing the videos. To do that go to Events -> <Your event> and click Update video data button. Another reason could be that the uploaded video has too low resolution. This can happen if the video was not uploaded from mobile app. In that case a red warning icon is displayed next to the video icon in performances list. Currently this can solved by uploading a better quality video or deciding to play the low quality video in your stream. At the moment, in both cases you have to contact Vikis support to do that for you.
Going LIVE
Now it is time to decide what streaming platform you want to use. Everything you've done so far will work exactly the same way regardless of the platform you choose. All you have to do is to go to Settings -> Stream and configure your streaming platform settings. You can use Vikis as a streaming platform too. In this case you use rtmp://global-live.mux.com:5222/app as a streaming server and ask us for a stream key.

After that, press the Start Streaming button in OBS or switch stream status to ON in Vikis.


That's it, your stream is live!
How many stream viewers can Vikis handle? Building a good streaming platform is a complex task. This is why Vikis uses an existing streaming platform trusted by thousands of customers (including some big names) that delivers millions of videos every year. In practice this means that when streaming with Vikis you can easily have thousands of viewers with no issues at all.
Summary
Install the following software
- OBS (https://obsproject.com/download)
- VLC Player (https://get.videolan.org/vlc/3.0.7/win64/vlc-3.0.7-win64.exe)
- WebSocket plugin (https://github.com/Palakis/obs-websocket/releases/download/4.8.0/obs-websocket-4.8.0-Windows-Installer.exe)
Configure OBS
- Create a scene called Scene
- Add the following sources (with exact names) to Scene
- VLC Video Source. Type VLC Video Source. Unselect Loop Playlist checkbox
- PERFORMANCE_TITLE. Type Browser; size 1280x50; Select the following two checkboxes
- PERFORMANCE_RESULTS. Type Browser; size 1280x720; Select the following two checkboxes
- Arrange the sources in this order (top to bottom): PERFORMANCE_RESULTS, PERFORMANCE_TITLE, VLC Video Source
Login to https://vikis.fi
- Go to Events -> <Your event>
- Click Update video data
- Go to Stream
- Enter localhost:4444 and click Connect to OBS
- Play videos and show results by pressing respective buttons